A Starter at Its Peak: Reading the Rise, Not the Clock
Kitchen temperature and feeding routines change how quickly a sourdough starter develops. Learn to read its height, bubbles, surface, aroma, and texture instead of relying on a fixed schedule.
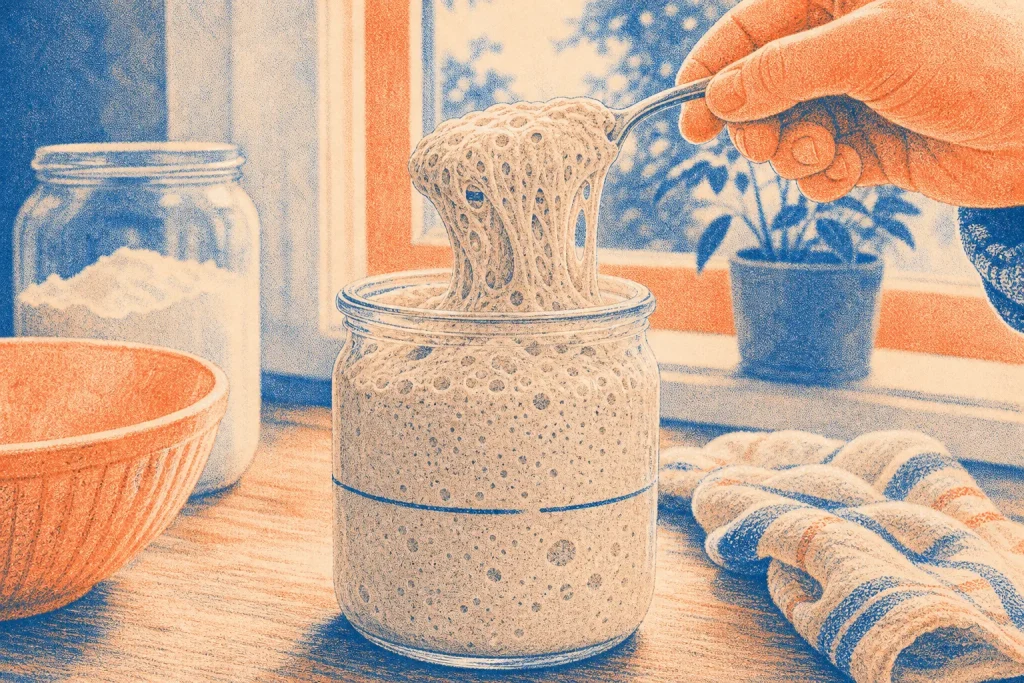
The most common mistake is feeding a starter because the clock says it is time, even though the jar shows it has barely begun to rise. That can dilute an active culture before it has used much of its food; waiting long after the peak can leave it slack and sharply sour. Read the starter’s changing shape and texture rather than treating a schedule as a verdict.
Peak Signals
A starter is near its peak when fermentation has inflated it substantially and it is close to its highest level before trapped gas begins to escape and the mixture settles. It is generally vigorous and aerated, with a surface that may be domed or just starting to flatten. “Peak” is a stage, not a precise height shared by every starter.
Height depends on flour, hydration, container shape, and how much starter you kept at feeding. A thick mixture can hold a rounded top; a loose one may rise and level off without forming a dome. Focus on change in your own jar: how much it expands, what its surface does, and whether its structure still looks buoyant.
Rise and Bubbles
Mark the starter’s level just after feeding, then look for a clear increase above that line. Tape or a washable marker on a straight-sided jar makes the change easy to see. Rising starter often shows bubbles along the glass, not just on top, and feels airy when stirred. The original feed line gives you a personal reference even as kitchen conditions change.
Do not treat a familiar rise target as a universal rule. Some starters expand dramatically; others rise more modestly but still show lively bubbles and a spongy interior. Bran-rich flour can make the mixture look more textured and alter its rise, while a narrow jar makes a small increase appear more dramatic than the same volume in a wide bowl.
Surface Changes
A rounded, inflated top often means the starter is still climbing. Near the peak, the dome may soften or flatten as the mixture reaches its maximum expansion. Small bubbles and a slightly uneven surface are ordinary signs of gas production. A few larger bubbles can appear too; on their own, they do not show whether the starter is ready.
After the peak, the surface may sink in the middle, wrinkle, or leave a tide mark higher on the jar than the current mixture. Those clues suggest it rose and then began to collapse. A sunken surface is not a failure: it tells you the starter has passed its most inflated stage. If you are baking, the best point to use it depends on the dough method, but a starter that has just flattened is generally easier to work with than one that has been collapsed for a long while.
Texture and Aroma
An active starter usually feels full of air: it may stretch in strands, look webbed when lifted, or have a light, sponge-like body. A spoonful can show bubbles throughout rather than only at the surface. Consider these signs together. A few top bubbles on a dense mixture may indicate surface activity, not that the whole jar has risen.
Texture depends on hydration. A stiff starter can feel elastic and hold its shape; a wetter one can pour or slump even while active. Think of the jar like a sponge: its shape matters less than whether it has filled with air and then begun to lose that air. Compare it to its earlier state instead of expecting every formula to feel alike.
Aroma can support what you see, but cannot pinpoint the peak by itself. Mild, tangy, fruity, or yogurt-like smells can accompany active fermentation. After the peak, the aroma may become sharper, more vinegary, or more alcoholic. The exact scent varies with the culture, flour, and feeding conditions.
Read aroma alongside rise and texture. A sharp smell with a collapsed surface and a high tide mark fits a starter that has used much of its available food. A tangy smell in a still-domed, expanding starter does not mean it has already fallen. If you see fuzzy growth or unusual colored patches, do not taste or try to salvage the starter. Discard it and clean the container and utensils before starting again. If the appearance is uncertain, take a conservative approach and consult a qualified food-safety professional rather than relying on smell or taste.
Changing Conditions
Temperature is a major reason one feeding can take a different amount of time from another. Fermentation tends to move faster in a warmer room and slower in a cooler one. A sunny windowsill, cold counter, or draft near a door can make the jar’s conditions different from the general room temperature. The temperature of the water and flour at feeding contributes too.
Other details matter: feeding ratio, flour type, hydration, and how recently the starter was refreshed. A smaller share of mature starter mixed with more fresh flour and water generally takes longer to show a comparable rise than a feed with a larger share of mature starter. Whole-grain flour can ferment actively while producing a denser-looking mixture, so judge movement and bubbles as well as height.
Say you feed a starter before breakfast on a cool morning and, later that day, it remains close to its starting line. Rather than feeding again because several hours have passed, keep it in a steady, comfortably warm place and watch the tape mark. If bubbles spread through the jar and the mixture rises, wait for the dome to soften before deciding it is near peak. The observable result is a decision based on the starter’s progress, not an assumed timetable.
Feeding Decisions
Feed according to the starter’s condition and your routine, not simply because a particular hour has arrived. For a starter kept at room temperature and refreshed regularly, many bakers choose to feed as it approaches or passes its peak. If it has collapsed and smells strongly acidic, it may be hungry; feeding can renew its activity, though the next rise may still take time.
If you are preparing starter for dough, follow the stage specified by the formula when possible, while checking that the starter is visibly active. A formula’s timing assumes conditions that may not match your kitchen. If the dough needs a vigorous starter and yours has not risen or developed bubbles, wait for activity instead of treating the recipe’s hour as a command.
A starter that has fallen can often be fed and used again after it becomes active. Missing the peak alone does not make a healthy starter unusable. Look at the extent of collapse, smell, and overall condition. If it regularly peaks while you are asleep or at work, adjust conditions rather than chasing it with extra feedings: change the feeding time, choose a cooler spot, or alter the feeding ratio. Change one factor at a time and keep notes so you can tell which adjustment gives you a more useful window.
Practical Checks
- Check the feed line on a straight-sided jar. If the starter has risen clearly above it, continue checking its surface; if it has barely moved, leave it undisturbed and check again later.
- Check for bubbles along the glass as well as on top. If bubbles appear throughout and the mixture looks airy, treat it as active; if activity is only at the surface, wait before deciding it is ready.
- Check whether the top is domed, flattening, or sunken. If a dome is softening, it may be near peak; if the center has sunk or a tide mark sits above the mixture, it has likely passed peak and can be fed or used according to your plan.
- Check the texture with a clean spoon. If the starter looks webbed or sponge-like throughout, that supports the signs of activity; if it remains dense, wait and reassess rather than relying on a few surface bubbles.
- Check the aroma alongside the visual signs. If it is tangy but still rising, do not assume it has fallen; if it is sharp and the starter has collapsed, consider feeding it before its next use.
- Check for fuzzy growth or unusual colored patches. If either is present, do not taste or scrape the starter; discard it and clean the container and utensils, then begin again. If you cannot tell what you are seeing, do not use the starter and seek qualified food-safety advice.
- Check the spot where the jar is fermenting. If it is in direct sun, near a draft, or in a noticeably cool place, move it to a steadier location; if conditions are already steady, change only one other factor at a time.
Keeping Useful Notes
Use the same jar when practical, mark the level after each feed, and note the flour, approximate room conditions, and whether the starter was domed or falling when you checked it. A note such as “bubbles at the sides; top flattened” is more useful than recording only the time. If you change flour or feeding ratio, write that down too. Patterns become clearer when you compare similar feeds.
Keep the jar loosely covered so gas can escape while the starter is protected from debris. Avoid filling it so high that a vigorous rise reaches the lid. A straight-sided container makes the level easier to read than a bowl, and a clean utensil helps prevent dried residue from obscuring the surface.
When the starter is still rising, lacks bubbles through the mixture, or remains dense after a recent feeding, wait rather than feeding by the clock. A delayed rise can mean the culture needs more time, particularly in a cool kitchen; it does not automatically mean the starter is dead. Keep conditions reasonably steady and avoid making several changes at once.
If a starter repeatedly shows no activity after sensible feeding in a stable, warmer place, review the flour, water, and feeding routine. Use clean equipment and potable water. For visible mold or unexplained discoloration, discard the starter rather than tasting it or scraping around the affected area. The feed mark, surface, bubbles, texture, and aroma together offer a better basis for action than any single sign or schedule.